Top blog articles
Back in the “old” days, hardwood floors were uneven and rugged, made from rough boards nailed to the floor joists. Exposed nail heads made them even more uncomfortable. Modern hardwood flooring is a far cry from those days: even, smooth and luxurious, thanks largely to the way flooring installation is done now. Tongue and groove flooring has revolutionized the way wood flooring is laid, making it no longer necessary to use external nails or staples to hold boards together. And what is even better is that with some skill and patience, you can handle the flooring installation yourself. Here’s a DIY guide on how to install tongue and groove flooring.
What is tongue and groove flooring?

Tongue and groove flooring was developed in the late 1800’s and is a way for hardwood planks to interlock without having nails through the tongue. The way it works is pretty simple. The boards have a protruding ridge, or tongue, running along the entire length of one side. The other side features an end-to-end groove. So the tongue side of one plank fits in seamlessly with the groove side of an adjacent plank. A similar system is also on the short-width side of every plank, so when laid properly, they interlock perfectly, giving you a smooth, interconnected hardwood floor.
Non-groove floors vs tongue and groove floors
There are a number of reasons why tongue and groove floors are a better choice for home interior flooring than old-school non-groove wood floors.
For starters, tongue and groove floors do not use nails at all, so exposed nail heads will never be a problem.
Tongue and groove floors are also a much more even flooring solution.
Thanks to the way tongue and groove planks interlock, you no longer have to worry about the planks warping, expanding, or shrinking, unlike regular non-groove wood floors.
This is why tongue and groove floors have become the preferred choice for wood floors among homeowners, with non-grooved wood floors being relegated to historical home restorations and exterior decking applications, which require space between planks to allow for drainage.
Are all tongue and groove floors hardwood?
The last few decades have seen tongue and groove floors expand from traditional hardwood floors to engineered floors, offering homeowners a lot more choices.
Engineered planks are made of layers of compressed wood fibers, resin, and polymers with a veneer layer covering the planks. This type of flooring is also called click flooring or lock flooring.
This offers consumers an endless choice of textures, colors, and finishes, including bamboo, hardwood, cobblestone, and tiles.
Another reason more people are choosing engineered floors over hardwood floors is that engineered flooring can be installed directly over tiles, linoleum, concrete, or whatever existing flooring your home may have.
Installing tongue and groove flooring
Installing engineered tongue and groove flooring is a fairly easy task since the planks snap together and create what is called a floating floor over any existing surface. In fact, engineered flooring actually comes with simple installation instructions out of the box, making it an ideal flooring material for DIY projects.
Hardwood tongue and groove flooring, on the other hand, is a lot more difficult to install, since it requires you to nail the planks to a subfloor even though they interlock. This is the reason why solid hardwood flooring is normally installed by experienced professionals. However, if you’re tempted to attempt installing the floor, we’d suggest you watch professionals install the flooring once at least before you try it yourself.
Tips to install hardwood flooring
- Completely empty the room of all its content before you begin the installation. And this is not limited to only the furniture on the floor. We’d advise you to clear your walls as well, so as to avoid damage from the dust that sanding and cutting will produce.
- You will need a layer between the subfloor and the new floor to avoid squeaking. A popular choice for a bond break is red rosin paper, which is sold in rolls 100 feet long by 3 feet wide. Roll out layers four inches thick over the subfloor and secure it using blue painter’s tape.
If you’re working on a floor that might be affected by moisture, like for example, a room right above a damp basement, consider using tar paper or asphalt-impregnated paper instead. You will need a staple gun or hammer tacker to secure this to the subfloor.
- Traditionally, hardwood tongue and groove flooring was nailed together by driving the nails at an angle through the tongue of the plank into the subfloor below. This is, however, a time-consuming and inconsistent process.
Instead, renting a hardwood flooring nailer from a construction company will make the installation process a lot faster and easier. This power tool, which you can rent for as little as $40 to $60 a day, shoots nails through the tongue of the plank at the correct angle. This will drive each plank snugly into the next.
Tips for installing engineered flooring
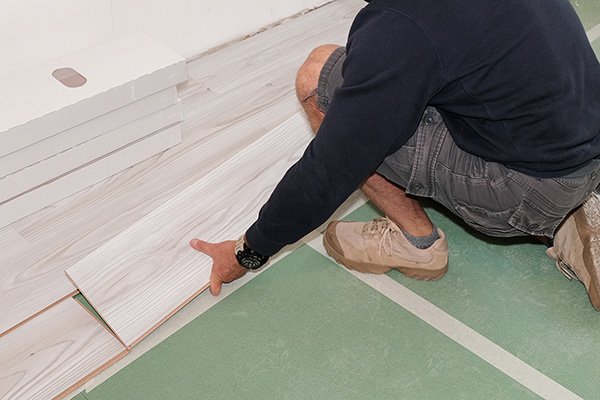
- Although engineered flooring can be installed on existing flooring, you will need a soundproofing layer underneath to prevent squeaky boards, just like with hardwood floors. We recommend a polyethylene barrier, so you have a layer that absorbs sound and provides protection against moisture as well.
- Remember to snap planks together, not force them together. Engineered flooring planks are designed in such a way that the tongue ridges and groove channels are deeper and narrower than hardwood planks. The right way to snap one onto the adjacent plank is to position the tongue of a plank against the groove of the previously attached plank and to push inward and downward simultaneously.
- Do not use a mallet to tap the planks together while fitting them. You will end up damaging the engineered planks. Instead, purchase an installation block approved by the board manufacturer for the purpose.
Written by Narayan Shrouthy. November 23, 2021
Narayan is a content writer for Kukun. With experience in both content writing and editing, Narayan mixes his writing and love for reading with his passion for music. As an active musician, He aims to be a key player in Kukun's content experience.
Top blog posts


See more >
Recommended
Join our newsletter
Get helpful renovation tips, insightful home maintenance articles, real estate market trends, and more.
Please enter a name
Please enter a valid e-mail