Top blog articles
While we pay a lot of attention to the maintenance and appearance of our homes, the humble garage often takes a back seat, in spite of the fact that it actually handles a tremendous amount of traffic. Our automobiles keep going in and out of them. Kids play in them. We use them for weekend projects and to keep our tools. Therefore, it’s only natural that garage floors experience wear and tear. But does that mean we have to replace the floor? Let’s take a quick look at garage floor replacement and the reasons garage floors get damaged.
Types of Damage
Most garages have concrete flooring and can last anywhere between three years to ten years. Factors that affect the longevity of your garage floor include the quality of the job done when the floor was laid, plumbing in and around the garage, the weather in the area you live in and a lot more.
There are four main types of damage that garage floors experience.
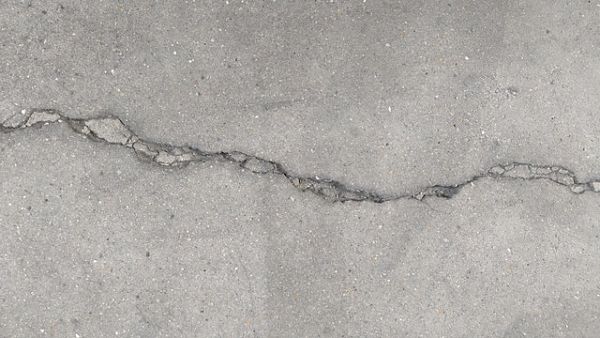
1. Cracking
Cracking is recognizable by the thin, long splits that start breaking up the concrete. If you start noticing cracks in newer garage floors, it may be an indication that the concrete was too wet when poured, was a weak mix, or dried up too early.
Another major reason for cracked concrete could be your region’s freeze-thaw cycle. Concrete is porous, so it gathers moisture in the warmer months. That moisture freezes in the winter. Snowmelt also adds to the moisture in the concrete. This freezing and thawing cause the concrete to crack and rupture.
Read more: Heated driveway mats
2. Spalling
When your top layer of concrete peels or crumbles away exposing the rough aggregate below, it’s called spalling. Spalling is also mostly caused due to the region’s freeze-thaw cycle.
Read more: Types of Garage Floor Tiles That Are Great in Every Sense
3. Low Spots
If your concrete garage floor looks like it’s sagging or sinking and has puddles in those areas, it is a sure sign that you have low spots. One of the main reasons for low spots is improper drainage in and around your garage area which causes water to collect under the surface. This leads to the soil underneath your floor getting weak over time, and eventually, to low spots along with crumbling, chipping and cracking.
Read more: Garage door financing & financing a Garage addition
4. Pitting
While spalling is at the surface, the damage caused by pitting goes a lot deeper. Pitting is easily recognizable as tiny holes on your garage floor. The major causes of pitting include age and poor installation.
Costs to Be Considered
Minor damage to your garage floor can be fixed with temporary measures such as an epoxy coating on your garage floor. Extensive damage, however, will require you to replace the floor. Here are the costs you’ll need to consider if you have to replace your concrete garage floor.
- Your base cost could vary from $6 to $15 a square foot.
- If your driveway isn’t large enough for a concrete truck to enter, you’ll have to pay for the concrete mix to be brought in in wheelbarrows.
- If your old floor needs to be torn out entirely, that will cost you extra as well.
- Normally, between four and six inches of concrete is poured while laying a floor. If you want more, it’s going to cost you that much more as well.
- Additional requirements such as extra reinforcement, underfloor heating, etc. will all obviously increase the cost of your project.
- Any additional permissions as per your local building code.
The Process
As with any home improvement project, laying a new floor for your garage has a process that your contractor and you will have to follow in order for your floor to last long.
- The first thing you will have to do is empty out your garage entirely. Make alternate arrangements to park your automobiles and clear out your tools, toys, your band’s practice gear, and anything else you may have stashed there. Use this as an opportunity to get rid of unnecessary junk you may have accumulated.
- Your contractor will then proceed to demolish your old flooring if your floor was a complete write-off.
- It may even be necessary to dig deeper to reach the foundation.
- If your foundation needs reinforcement, now is when that will be addressed.
- The next step is to install a geotextile membrane as a precursor to starting plumbing work.
- Your garage will get its new drainage system.
- Your floor area will be filled with gravel up to three-quarters of an inch and compacted.
- Next, a vapor barrier will be put in place.
- Reinforcements like fiber mesh or wire mesh will now be installed.
- Finally, the concrete mix will be poured on the floor and allowed to set.
Caution! Do Not Use Immediately!
While your new floor may look like it’s hard enough to drive on a couple of days it has been laid, the drying of the concrete takes quite a long time even after the floor has been cured. Experts suggest your floor will attain its full strength in around 28 days after it has been poured. Keep that in mind before you restart using your garage.
Finishing Touches
Once your garage floor has dried completely, you could use an epoxy paint as a final layer. Not only will your floor have a polished, showroom-like finish, it will also be a lot easier to clean and maintain.
Read more: Essential steps to get your garage storage organized
Written by Narayan Shrouthy. June 18, 2020
Narayan is a content writer for Kukun. With experience in both content writing and editing, Narayan mixes his writing and love for reading with his passion for music. As an active musician, He aims to be a key player in Kukun's content experience.
Top blog posts


See more >
Recommended
Join our newsletter
Get helpful renovation tips, insightful home maintenance articles, real estate market trends, and more.
Please enter a name
Please enter a valid e-mail