Top blog articles
Laminate flooring is a stylish, budget-friendly option that can mimic the look of wood, tile, or stone, without the high cost. And, the best part? This type of flooring installation is a DIY-friendly project that even beginners can tackle. In this guide, we’ll help you understand how to install laminate flooring step-by-step and answer some of the most common questions homeowners have.
Why choose laminate flooring?
Laminate flooring offers the beauty of hardwood with the durability to withstand everyday wear and tear. Moreover, it’s water-resistant (in most cases), easy to clean, and available in a wide range of styles. Plus, it floats over your subfloor. That is to say, it isn’t glued or nailed down. This makes the installation much simpler.
What’s the difference between laminate and vinyl flooring?
While both are budget-friendly and easy to install, laminate has a wood-based core, making it more rigid and realistic in appearance. Vinyl flooring, on the other hand, is 100% synthetic. This is primarily the reason it’s better for moisture-prone areas such as bathrooms or basements.
What to put down before laminate flooring?
Before you begin installing a laminate floor, it’s essential to prepare your subfloor and underlayment. Here’s what you need:
Underlayment
This is a thin layer of foam or cork that provides cushioning, sound absorption, and moisture protection. Some laminate planks come with underlayment attached; if yours don’t, you’ll need to buy it separately.
Moisture barrier (for concrete subfloors)
If you’re installing over concrete, a vapor barrier is a must. It prevents moisture from seeping up into the flooring.
There are two types of moisture barriers:
- 6 mil polyethylene plastic sheeting: This is the most common and inexpensive choice for homeowners.
- Combination underlayment with integrated vapor barrier: This is great for convenience and performance, but comes with a higher price tag.
Clean and level subfloor
Whether you’re working with concrete, plywood, or existing vinyl, the subfloor must be clean, dry, and level (within 3/16 inch over 10 feet). Keep in mind that any bumps or dips could lead to problems down the line.
How to install laminate flooring?
Tools and materials you’ll need
- Laminate flooring planks
- Underlayment (if not pre-attached)
- Moisture barrier (for concrete subfloors)
- Tape measure
- Utility knife
- Spacers
- Hammer and tapping block
- Pull bar
- Circular saw or laminate cutter
- Pencil and square
- Safety gear (gloves, goggles)
The process
Acclimate the flooring
Let your laminate flooring sit in the room where it will be installed for 48–72 hours. This allows it to adjust to the room’s temperature and humidity, preventing expansion or contraction after installation.
Prepare the subfloor
Remove any old carpet or flooring. Sweep and vacuum thoroughly. Make sure the surface is level, patch any holes, and sand down high spots.
Install the underlayment
Roll out the underlayment across the floor, edge to edge, trimming as needed with a utility knife. Tape the seams according to the manufacturer’s instructions. This step is crucial for protecting the laminate and extending its lifespan.
Plan your layout
Measure the room and determine the direction to lay the planks (usually parallel to the longest wall or the direction of natural light). Calculate how wide your last row will be. If it’s less than 2 inches, cut your first row to make the last one wider.
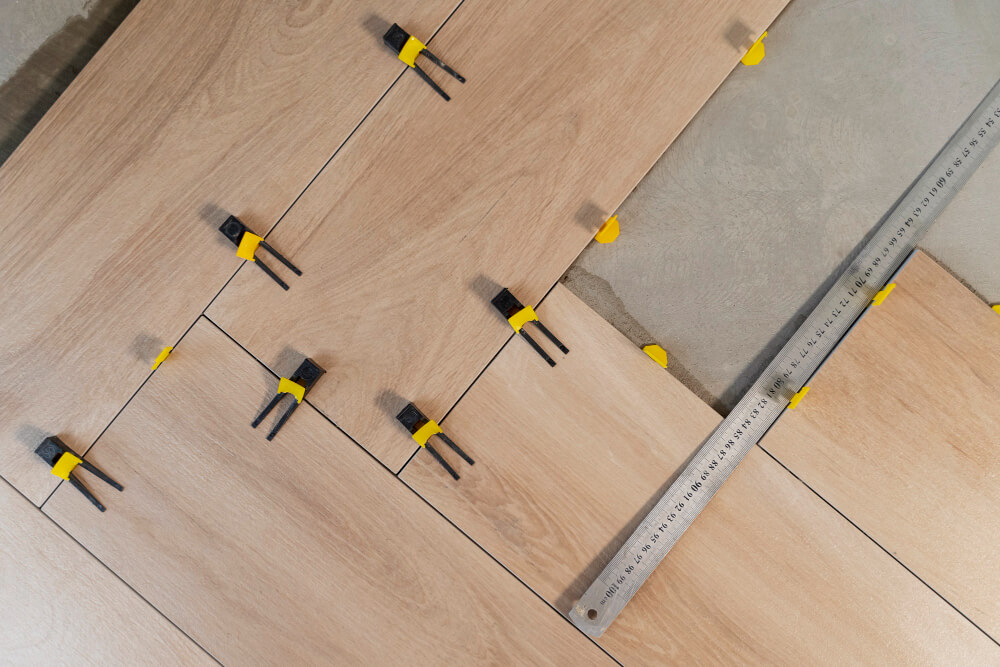
Start laying the planks
- Begin in a corner with the tongue side facing the wall.
- Use spacers to leave a 1/4-inch expansion gap between the flooring and the wall.
- Connect the next plank by inserting the tongue into the groove at an angle, then pressing it flat.
- Tap the planks into place using a tapping block and mallet for a snug fit.
Continue the pattern
Stagger the seams by starting each new row with a plank that is at least 12 inches shorter or longer than the one in the previous row. This creates a natural, more stable pattern.
Cut to fit
Use a circular saw or laminate cutter to trim planks to fit at the end of rows and around doorways or vents. Always wear safety goggles and follow the tool’s instructions carefully.
Install the final row
Use a pull bar to fit the last row snugly into place, ensuring you leave an expansion gap. You may need to trim these planks lengthwise using a table saw or jigsaw.
Give the finishing touches
- Remove spacers.
- Install baseboards or quarter-round molding to cover the expansion gap (do not nail into the flooring).
- Add thresholds or transition strips at doorways or where the laminate meets another type of flooring.
Is laminate flooring easy to install as compared to other types of flooring?
Yes, laminate flooring installation is relatively easy, especially compared to hardwood flooring. It uses a click-lock system where planks snap together. There’s no need for nails, glue, or complicated tools. Most DIYers can install flooring in a single room over a weekend.
What are the common mistakes to avoid when installing laminate flooring?
- Skipping acclimation: Not allowing the planks to adjust to the room can result in warping or gaps later.
- Not leveling the subfloor: Uneven surfaces can lead to a bouncy or noisy floor.
- Forgetting the expansion gap: Laminate needs room to expand and contract. No gap = buckling floor.
- Improper staggering: Repeating seams can look unnatural and weaken the floor structure.
- Using the wrong tools: Always use a tapping block, not a hammer, directly on the plank.
Final thoughts
Installing laminate flooring can be a satisfying and cost-effective way to transform your home. With proper preparation, the right materials, and the correct steps, even beginners can achieve professional-looking results. So grab your tools and get started. You’ll be walking on your stylish new floors in no time!
FAQs on how to install laminate flooring
How long does it take to install laminate flooring in one room?
Most DIYers can complete a single 12×12 room in 1–2 days, including prep and cleanup. The actual laying of the laminate planks can take just a few hours, especially if the layout is simple and your tools are ready.
How much laminate flooring do I need to buy for my room?
The first step is to measure the square footage of your room (length × width). The rule of thumb is to add an extra 10% to account for mistakes, cuts, and future repairs. That said, for rooms with a lot of angles or cuts (like around staircases), you might add 15%.
Can I install laminate flooring over existing flooring?
Yes, you can install laminate over certain existing floors such as vinyl, tile, or linoleum—as long as the surface is flat, clean, and in good condition. However, it’s not recommended to install laminate over carpet. Always remove carpet and padding for a proper installation.
Can I install laminate in bathrooms or kitchens?
Yes, but only if it’s water-resistant or waterproof laminate. In bathrooms, make sure to use a 100% silicone sealant around the edges to prevent moisture from seeping underneath. Never install standard laminate in areas prone to standing water.
In what direction should laminate flooring be installed?
Laminate flooring typically looks best when installed parallel to the longest wall or in the direction of natural light entering the room. This enhances the sense of space and improves the appearance of the grain pattern.
How do I clean laminate flooring after installation?
Use a damp mop or microfiber cloth and a laminate-safe cleaner. Avoid soaking the floor or using a steam mop, as excess water can damage the boards. The best way is to vacuum the floor with a soft brush attachment or sweep regularly to remove debris.
Written by Ramona Sinha. June 13, 2025
Ramona is the Senior Content Writer for Kukun. This experienced blogger uses simple and succinct words to decipher the complex phenomenon called life. She has written articles covering a broad range of topics, such as real estate, lending and mortgage, finance, business, taxation, home designs, home improvement projects, decor concepts, and more. An avid traveler, she’s a digital nomad at heart and an animal lover from the depth of her soul.
Top blog posts


See more >
Recommended
Join our newsletter
Get helpful renovation tips, insightful home maintenance articles, real estate market trends, and more.
Please enter a name
Please enter a valid e-mail